A plugin provides a way to extend or enhance the basic functionality of Elasticsearch without having to fork it from GitHub.
Elasticsearch supports a plugin framework which provides many custom plugin classes that we can extend to create our own custom plugin.
A plugin is just a Zip file containing one or more jar files with compiled code and resources. Once a plugin is packaged, it can be easily added to an Elasticsearch installation using a single command.
This post will explain how to create an Elasticsearch plugin for Elasticsearch 6.4.1 with maven and Eclipse IDE.
If you follow along you’ll be able to create a “Hello World!” plugin demonstrating the classic hello world example.
Cheers to the beginning 🙂
Steps to create an Elasticsearch plugin
1. Setting up the plugin structure:
1.1) Create a maven project using Eclipse IDE (you can use any IDE, I personally prefer Eclipse and IntelliJ).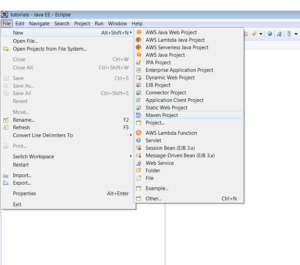
1.2) Skip the archetype selection.
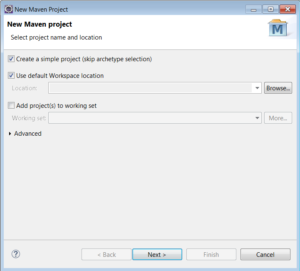
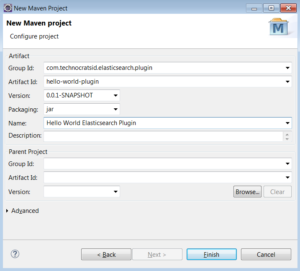
1.3) Add the Group Id, Artifact Id and Name, then click finish.
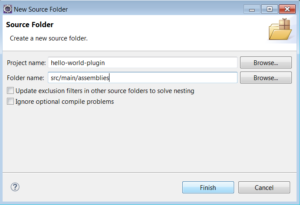
1.4) Create a source folder src/main/assemblies.
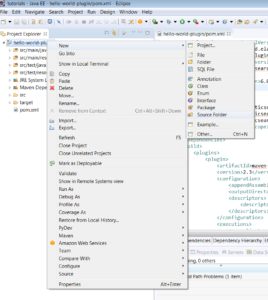
1.5) Click finish.
After this the plugin project structure should look like:
│

├── pom.xml

├── src

│   └── main

│       ├── assemblies

│       ├── java

│       └── resources

│
So the plugin skeleton is ready.
2. Configuring the plugin project:
2.1) Open the pom.xml and add elasticsearch dependency.
<properties>
  <elasticsearch.version>6.4.1</elasticsearch.version>
</properties>
<dependencies>
  <dependency>
    <groupId>org.elasticsearch</groupId>
    <artifactId>elasticsearch</artifactId>
    <version>${elasticsearch.version}</version>
    <scope>provided</scope>
  </dependency>
</dependencies>
Notice that the scope of elasticsearch dependency is provided. This is because the plugin will run in elasticsearch which is already provided.
2.2) Add the plugin descriptor file.
All plugins must contain a file called
plugin-descriptor.properties.
This means you must provide a plugin-descriptor.properties which should be assembled with your plugin.
Create plugin-descriptor.properties file in scr/main/resources.
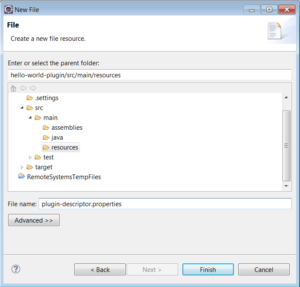
and add the following content:
description=${project.description}
version=${project.version}
name=${project.artifactId}
classname=com.technocratsid.elasticsearch.plugin.HelloWorldPlugin
java.version=1.8
elasticsearch.version=${elasticsearch.version}
2.3) Add the plugin security policy file (Optional).
Some plugins require additional security permissions. A plugin can include an optional plugin-security.policy file containing grant statements for additional permissions..more
Create plugin-security.policy file in scr/main/resources.
and add the following content:
grant {
permission java.security.AllPermission;
};
The above content is just a reference and you might require different set of permissions. To know more about JDK permissions refer this.
After the creation of plugin-security.policy file, you have to write proper security code around the operations requiring elevated privileges.
AccessController.doPrivileged(
  // sensitive operation
);
Note: We don’t need to perform this step for the Hello World Plugin. This is necessary if your plugin needs some security permissions.
2.4) Create the plugin.xml file.
Create the plugin.xml file in src/main/assemblies which will be used to configure the packaging of the plugin.
and add the following content:
<?xml version="1.0"?>
<assembly>
  <id>plugin</id>
  <formats>
    <format>zip</format>
  </formats>
  <includeBaseDirectory>false</includeBaseDirectory>
  <fileSets>
    <fileSet>
      <directory>target</directory>
      <outputDirectory>/</outputDirectory>
      <includes>
        <include>*.jar</include>
      </includes>
    </fileSet>
  </fileSets>
  <files>
    <file>
      <source>${project.basedir}/src/main/resources/plugin-descriptor.properties</source>
      <outputDirectory>/</outputDirectory>
      <filtered>true</filtered>
    </file>
    <file>
      <source>${project.basedir}/src/main/resources/plugin-security.policy</source>
      <outputDirectory>/</outputDirectory>
      <filtered>false</filtered>
    </file>
  </files>
  <dependencySets>
    <dependencySet>
      <outputDirectory>/</outputDirectory>
      <unpack>false</unpack>
    </dependencySet>
  </dependencySets>
</assembly>
2.5) Declare the maven assembly plugin in the pom.xml.
<plugin>
  <groupId>org.apache.maven.plugins</groupId>
  <artifactId>maven-assembly-plugin</artifactId>
  <configuration>
    <appendAssemblyId>false</appendAssemblyId>
    <outputDirectory>${project.build.directory}/releases/</outputDirectory>
    <descriptors>
      <descriptor>${basedir}/src/main/assemblies/plugin.xml</descriptor>
    </descriptors>
  </configuration>
  <executions>
    <execution>
      <phase>package</phase>
      <goals>
        <goal>attached</goal>
      </goals>
    </execution>
  </executions>
</plugin>
2.6) Declare the maven compiler plugin in the pom.xml.
<plugin>
  <groupId>org.apache.maven.plugins</groupId>
  <artifactId>maven-compiler-plugin</artifactId>
  <version>3.5.1</version>
  <configuration>
    <source>1.8</source>
    <target>1.8</target>
  </configuration>
</plugin>
After some refactoring the complete pom.xml looks like this:
<project xmlns="http://maven.apache.org/POM/4.0.0" xmlns:xsi="http://www.w3.org/2001/XMLSchema-instance"
xsi:schemaLocation="http://maven.apache.org/POM/4.0.0 http://maven.apache.org/xsd/maven-4.0.0.xsd">
<modelVersion>4.0.0</modelVersion>
<groupId>com.technocratsid.elasticsearch.plugin</groupId>
<artifactId>hello-world-plugin</artifactId>
<version>0.0.1-SNAPSHOT</version>
<name>Hello World Elasticsearch Plugin</name>
<properties>
  <maven.compiler.source>1.8</maven.compiler.source>
  <maven.compiler.target>1.8</maven.compiler.target>
  <elasticsearch.version>6.4.1</elasticsearch.version>
  <maven.compiler.plugin.version>3.5.1</maven.compiler.plugin.version>
  <elasticsearch.assembly.descriptor>${basedir}/src/main/assemblies/plugin.xml</elasticsearch.assembly.descriptor>
</properties>
<dependencies>
  <dependency>
    <groupId>org.elasticsearch</groupId>
    <artifactId>elasticsearch</artifactId>
    <version>${elasticsearch.version}</version>
    <scope>provided</scope>
  </dependency>
</dependencies>
<build>
  <plugins>
    <plugin>
      <groupId>org.apache.maven.plugins</groupId>
      <artifactId>maven-compiler-plugin</artifactId>
      <version>${maven.compiler.plugin.version}</version>
      <configuration>
        <source>${maven.compiler.target}</source>
        <target>${maven.compiler.target}</target>
      </configuration>
    </plugin>
    <plugin>
      <groupId>org.apache.maven.plugins</groupId>
      <artifactId>maven-assembly-plugin</artifactId>
      <configuration>
        <appendAssemblyId>false</appendAssemblyId>
        <outputDirectory>${project.build.directory}/releases/</outputDirectory>
        <descriptors>
          <descriptor>${elasticsearch.assembly.descriptor}</descriptor>
        </descriptors>
      </configuration>
      <executions>
        <execution>
          <phase>package</phase>
          <goals>
            <goal>attached</goal>
          </goals>
        </execution>
      </executions>
    </plugin>
  </plugins>
</build>
</project>
3. Create the plugin classes:
3.1) Creating a new REST endpoint _hello.
To create a new endpoint we should extend org.elasticsearch.rest.BaseRestHandler. But before doing that, initialize it in the plugin.
Create a class HelloWorldPlugin which extends org.elasticsearch.plugins.Plugin and implements the interface org.elasticsearch.plugins.ActionPlugin.
public class HelloWorldPlugin extends Plugin implements ActionPlugin {
}
Implement the getRestHandlers method:
public class HelloWorldPlugin extends Plugin implements ActionPlugin {
@Override
public List<RestHandler> getRestHandlers(final Settings settings,
                                         final RestController restController,
                                         final ClusterSettings clusterSettings,
                                         final IndexScopedSettings indexScopedSettings,
                                         final SettingsFilter settingsFilter,
                                         final IndexNameExpressionResolver indexNameExpressionResolver,
                                         final Supplier<DiscoveryNodes> nodesInCluster) {
        return Collections.singletonList(new HelloWorldRestAction(settings, restController));
    }
}
Now implement the HelloWorldRestAction class:
Create a class HelloWorldRestAction which extends org.elasticsearch.rest.BaseRestHandler.
public class HelloWorldRestAction extends BaseRestHandler {
    @Inject
    public HelloWorldRestAction(Settings settings, RestController restController) {
          super(settings);
    }

    @Override
    public String getName() {
          // TODO Auto-generated method stub
          return null;
    }

    @Override
    protected RestChannelConsumer prepareRequest(RestRequest request, NodeClient client) throws IOException {
          // TODO Auto-generated method stub
          return null;
     }
}
Register the endpoint _hello for a GET request:
@Inject
public HelloWorldRestAction(Settings settings, RestController restController) {
   super(settings);
   restController.registerHandler(RestRequest.Method.GET, "/_hello", this);
}
Implement the prepareRequest method to return “Hello World!” for a GET request to _hello endpoint:
@Override
protected RestChannelConsumer prepareRequest(RestRequest request, NodeClient client) throws IOException {
  return channel -> {
        XContentBuilder builder = channel.newBuilder();
        builder.startObject().field("message", "Hello World!").endObject();
        channel.sendResponse(new BytesRestResponse(RestStatus.OK, builder));
  };
}
After all these changes and some refactoring the HelloWorldRestAction class will look like:
public class HelloWorldRestAction extends BaseRestHandler {

private static String NAME = "_hello";

@Inject
public HelloWorldRestAction(Settings settings, RestController restController) {
   super(settings);
   restController.registerHandler(RestRequest.Method.GET, "/" + NAME, this);
}

@Override
public String getName() {
   return NAME;
}

@Override
protected RestChannelConsumer prepareRequest(RestRequest request, NodeClient client) throws IOException {
   return channel -> {
      XContentBuilder builder = channel.newBuilder();
      builder.startObject().field("message", "HelloWorld").endObject();
      channel.sendResponse(new BytesRestResponse(RestStatus.OK, builder));
   };
  }
}
4. Build the plugin:
mvn clean install
After this step you’ll find the packaged plugin Zip in target/releases folder of your plugin project.
5. Install the plugin:
You can install this plugin using the command:
bin\elasticsearch-plugin install file:///path/to/target/releases/hello-world-plugin-0.0.1-SNAPSHOT.zip
6. Test the plugin:
After installing the plugin start Elasticsearch.
bin\elasticsearch
Perform the following request in Kibana:
GET /_hello
Or, use curl:
curl -XGET "http://localhost:9200/_hello
Output:
{
  "message": "HelloWorld"
}
7. Conclusion:
You’ve got a head start !!
Now sky is the limit 🙂
References
8 thoughts on “How to create an Elasticsearch 6.4.1 Plugin”
Comments are closed.


Great experience and explanation about plugins
Glad you liked it 🙂
Nice explanation
Thank you 🙂
Hi,
I am referring your code and write sample plugin code as you mention. while installing the plugin I am getting below error:
Downloading file:///mnt/e/xxx/xxx/ElasticSearchPlugin/target/releases/ElasticsearchPlugin-1.0-SNAPSHOT.zip
[=================================================] 100%
ERROR: `elasticsearch` directory is missing in the plugin zip
I am using elasticsearch 5.1.1 version
Could you please help me?
For elasticsearch version 5.1.x all the plugin files must be contained in a directory called elasticsearch and this is why you’re getting that error while installing the plugin. So to make it 5.1.1 compatible you need to replace all the ‘/’ in outputDirectory statements of plugin.xml to elasticsearch. Build the plugin again and then install it.
good job
Thank you!